Deploy
On a live site, the posts stay in your GitHub repository. Editors sign in with GitHub, and each save is a commit on GitHub. You do not fill in any GitHub settings by hand: Pluto sends them to GitHub, and GitHub creates the App after you confirm.
You need:
- The project from the Quickstart, pushed to a GitHub repository.
- A host with a server runtime, such as Vercel or Netlify. This page uses Vercel. For a static site with the admin on your computer, see A static site on GitHub Pages.
In the admin on your computer, open Settings, then Deploy. The tab links to each host, and sets up GitHub Pages for you.
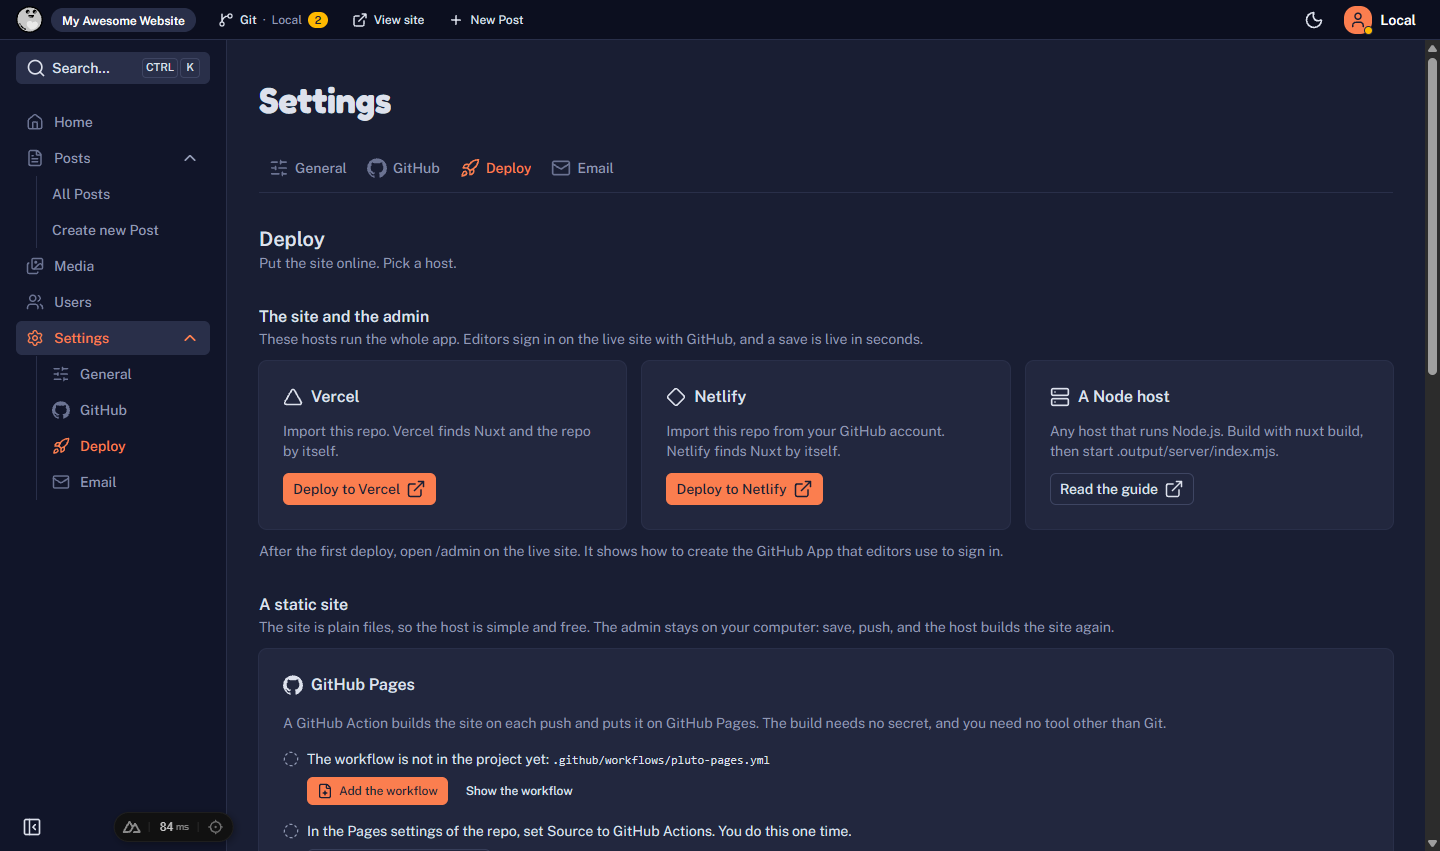
Deploy the site
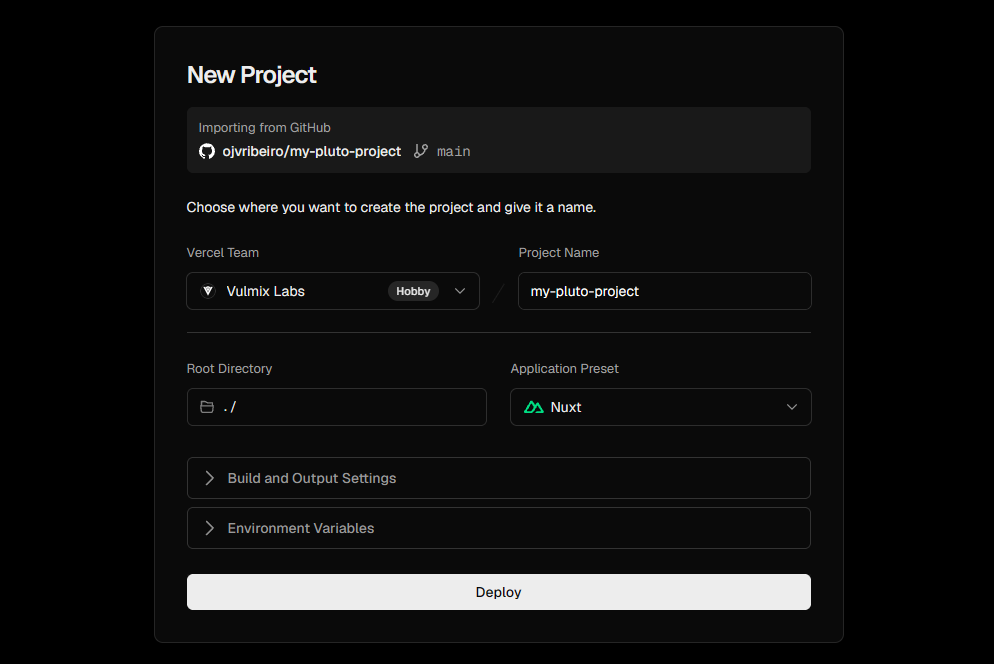
Push your commits to the GitHub repository. In Settings → Deploy, select Deploy to Vercel. Vercel opens the import page of your repository and detects Nuxt. Select Deploy.
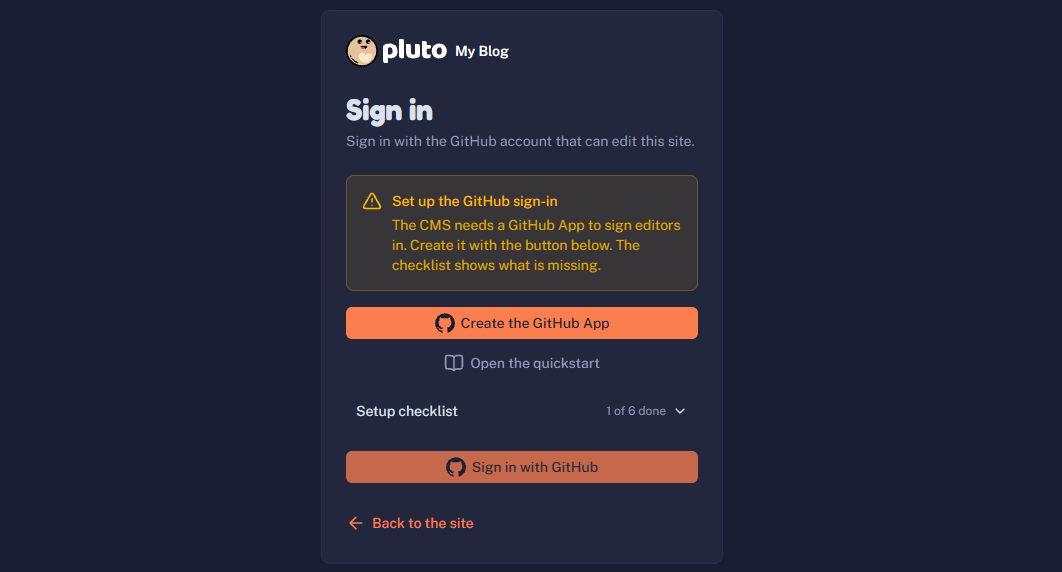
Create the GitHub App
To connect your live site to your Pluto dashboard, you need a GitHub App. Pluto fills in the settings of the App. You only confirm them.
Open https://<your-site>/admin. The page shows Set up the GitHub sign-in. Select Create the GitHub App.
GitHub opens with the App settings filled in. Confirm the name and select Create GitHub App.
Copy the environment variables
GitHub sends you back to your site. The result page shows a block of environment variables. Select Copy.
Paste them in Vercel
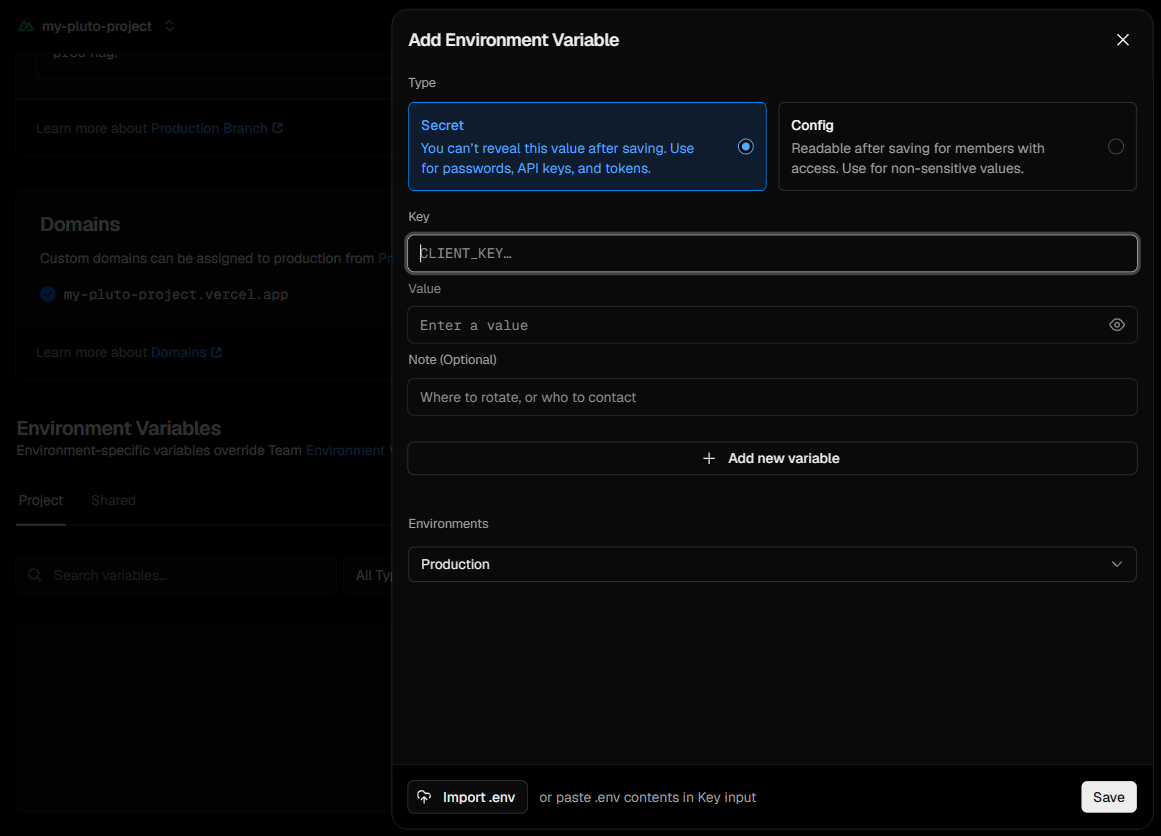
In Vercel, open Settings > Environments > Production > Environment Variables > Add Environment Variable. Paste the block into the first field: Vercel reads the lines and fills the rows. Save. Then redeploy, so that the site reads the new values.
Install the App and sign in
On the result page, select Install the App. Install the App on your repository only. Then open /admin and select Sign in with GitHub.
If you left the result page, open /admin again. The page shows an Install the App button.
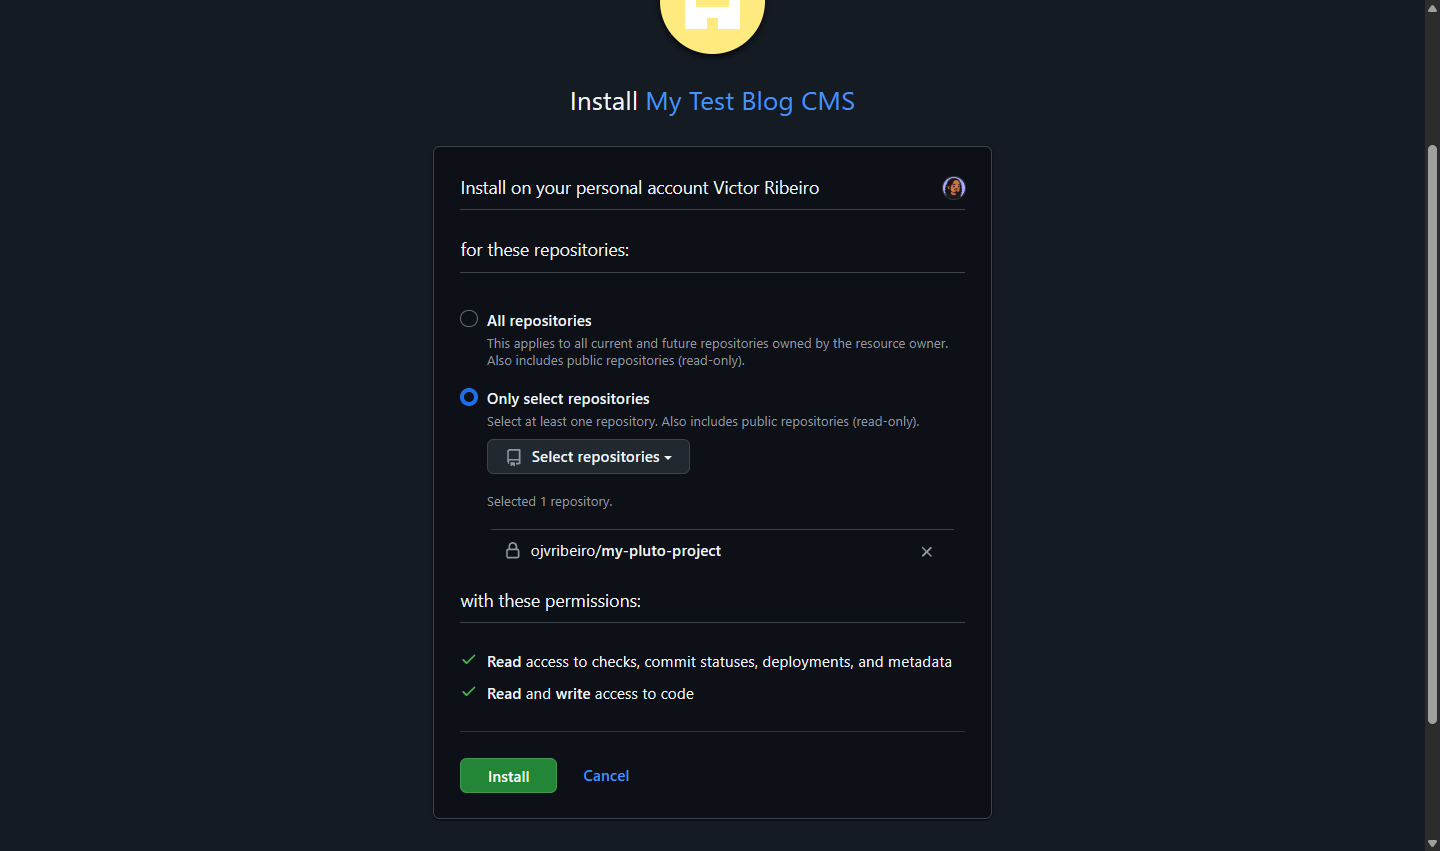
Every user with push access to the repository can sign in and edit. After the redeploy, the setup routes answer 404, so nobody can create a second App on the live site.
A save on the live site
A save is a commit on GitHub. The blog reads the posts from GitHub at run time, with a cache, so a post shows in seconds. A save of published content also starts a new build. The build keeps a copy of the content, and when GitHub does not answer, the blog shows that copy. A draft save does not start a build: its commit message ends with [skip ci]. See Commits and rebuilds.
Other hosts
Netlify
In Settings → Deploy, select Deploy to Netlify, then pick your repository. Netlify detects Nuxt, and Pluto reads the repository from the Netlify build. Then do the steps above from Create the GitHub App: paste the variables in Site configuration → Environment variables and deploy again.
A Node host
Any host that runs Node.js 22 or later works, for example a VPS, Render, Railway, or Fly.io.
- Build:
npm run build. The output is in.output/. - Start:
node .output/server/index.mjs. SetPORTif the host asks for one. - Set
PLUTO_GITHUB_REPOtoowner/namebefore the build. Pluto finds the repository by itself on Vercel and Netlify only. - Do the steps above from Create the GitHub App. Set the variables in the environment of the running server, then restart it.
A static site on GitHub Pages
The site can be plain files on GitHub Pages, for free. There is no server, so the admin stays on your computer: you write in the admin, push, and a GitHub Action builds the site again. The build reads the Markdown in the repository, so it needs no token and no secret.
- In the admin on your computer, open Settings → Deploy. In the GitHub Pages card, select Add the workflow, then confirm. Pluto writes
.github/workflows/pluto-pages.ymland commits it to your local repository. It changes nothing on GitHub. - Select Pages settings on GitHub. Under Build and deployment, set Source to GitHub Actions. You do this one time.
- Push. Use the Push button of the card, the Git badge in the admin bar, or
git push. The first build takes a few minutes. - Select Check again. When the build is done, the card shows the address of the site, for example
https://<owner>.github.io/<repository>/. If the build fails, select Open the build log.
You need Git only. Pluto reads the result of the last build from the GitHub API. For a private repository, it needs the GitHub App or a read token in .env to read the result. See Reference.
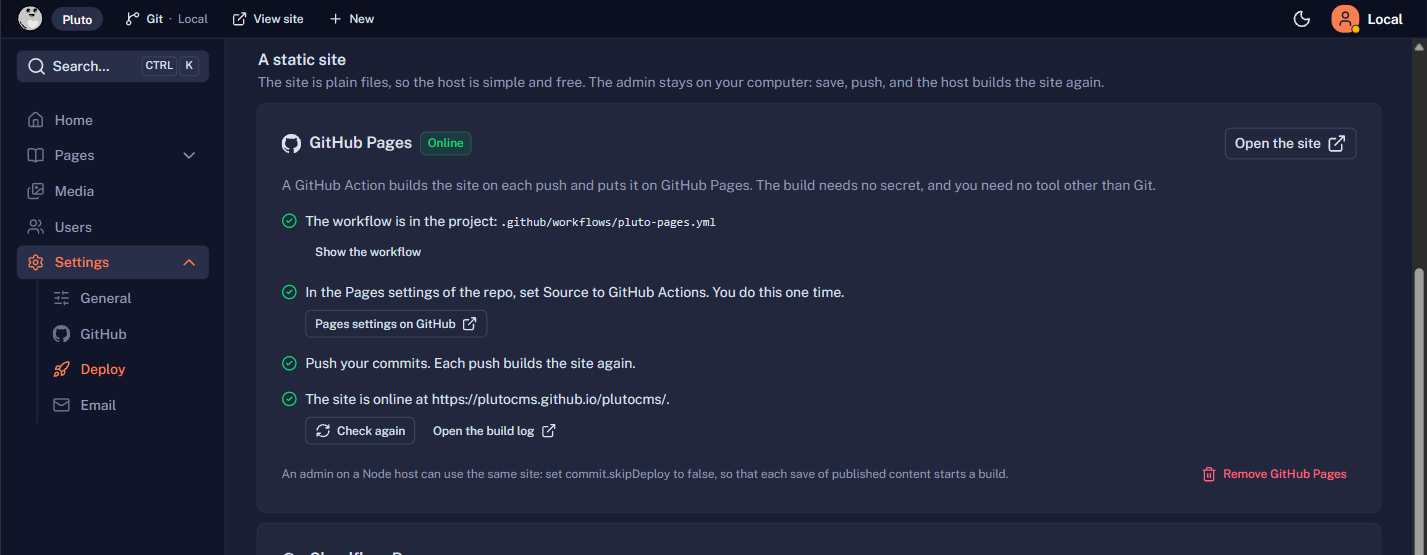
The workflow builds with nuxt generate --preset github_pages. A project site lives under /<repository>/: the workflow gives that path to the build in PLUTO_BASE_URL, and Pluto puts it before the links and the images of the site and of each post. The workflow also gives the full address of the site in NUXT_PUBLIC_WEBSITE_URL, for the canonical URLs, the sitemap and the feed of the SEO layer. Drafts are not in the output.
Serve the site at the root
GitHub decides the path, not Pluto. It serves a repository under its name, https://<owner>.github.io/<repository>/. Two setups serve the site at the root, and the workflow then builds it for the root, with no change:
- A custom domain, such as
blog.example.com. See On GitHub Pages. - A repository named
<owner>.github.io. GitHub serves it athttps://<owner>.github.io/. Each account or organization has one.
The search and the pages of a post list work on the static site too. The build writes all the published posts to one file, and the browser answers from it. See On a static site.
An admin on a Node host can publish to the same static site: each save of published content starts the Action. See Commits and rebuilds.
Stop using GitHub Pages
In the admin on your computer, open Settings → Deploy. In the GitHub Pages card, select Remove GitHub Pages, then confirm. Pluto deletes the workflow and commits the change. It changes nothing on GitHub.
- Push, so that GitHub stops building the site.
- The last site stays online. To take it offline, open the Pages settings of the repository and select Unpublish site.
Cloudflare Pages
Cloudflare Pages can build the same static site. Connect the repository in Cloudflare, and use the build command npx nuxt generate and the output directory .output/public.
Use your own domain
Open Settings → Deploy, then go to Domain.
On Vercel or Netlify
The host serves the domain and gets the HTTPS certificate. Add the domain in the domain settings of the host. Then add the DNS records that the host shows at your domain registrar.
The live admin knows its host. It shows the current address of the site and a link to the domain settings of that site. The admin on your computer shows a link for each host.
On GitHub Pages
The domain is in the Pages settings of the repository. The GitHub Pages card of Domain shows the steps, the DNS records for your domain, and a check of the DNS.
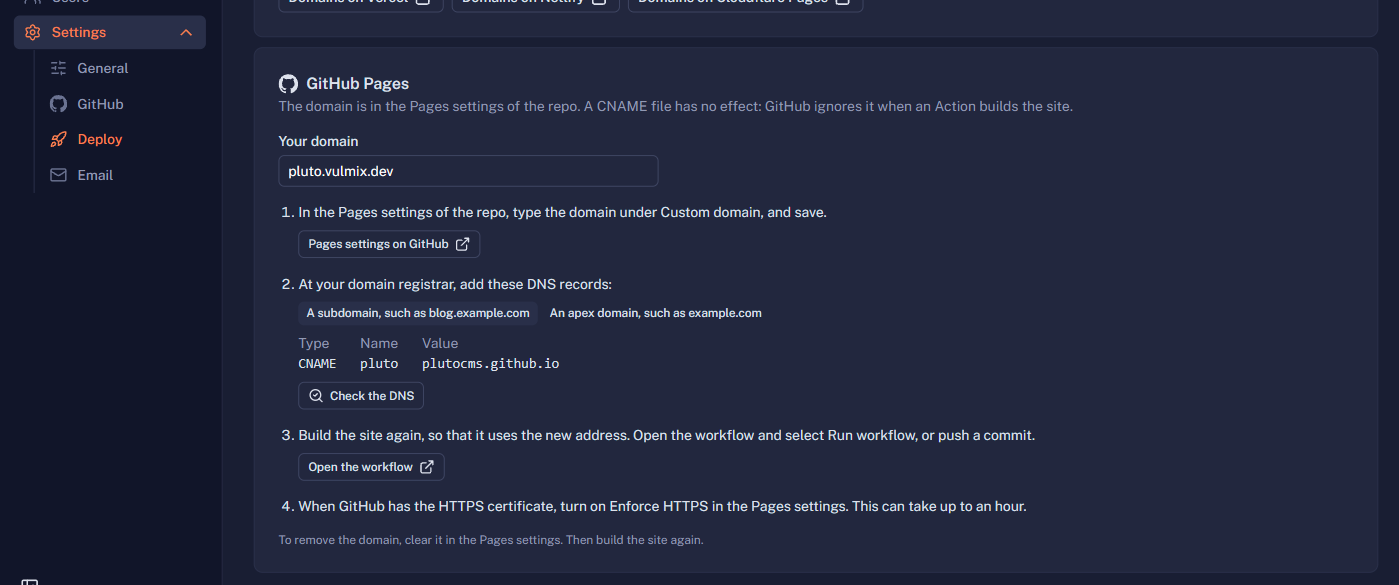
- Set up GitHub Pages first. See A static site on GitHub Pages.
- Type your domain in the Your domain field, for example
blog.example.com. - Select Pages settings on GitHub. Type the domain under Custom domain, and save.
- Add the DNS records that the card shows at your domain registrar:
- For a subdomain, such as
blog.example.com: aCNAMErecord to<owner>.github.io. - For an apex domain, such as
example.com: the fourArecords and the fourAAAArecords of GitHub Pages.
- For a subdomain, such as
- Select Check the DNS. Pluto looks up the domain and tells you if it points to GitHub Pages. New records can take a few hours to work.
- Build the site again: the site moves from
/<repository>/to the root of the new domain. Select Open the workflow, then Run workflow on GitHub. Or push a commit. - When GitHub has the HTTPS certificate, turn on Enforce HTTPS in the Pages settings. This can take up to an hour.
CNAME file. GitHub ignores that file when a GitHub Action builds the site.To stop using the domain, clear it in the Pages settings. Then build the site again. The site goes back to https://<owner>.github.io/<repository>/.
Deploy a template in one click
The templates repository has Deploy with Vercel and Deploy to Netlify buttons for each template. A button copies the folder of the template to a new repository in your GitHub account and deploys it. The new repository gets the files of the site only. For the blog and the dashboard templates, the copy uses the Git CMS: open /admin/login on the new site and create the GitHub App, as in the steps above. For the shop template, the host asks for the Supabase values first.
If something goes wrong
- The result page or the settings page shows a problem: see Troubleshooting.
- You prefer to create the App by hand: see GitHub App.
- You want the GitHub sign-in on your machine too: see Test GitHub on your machine.
Deploy a Supabase project
A project with the Supabase backend needs these variables in Vercel before the first deploy:
| Variable | Value |
|---|---|
SUPABASE_URL | The Supabase project URL |
SUPABASE_KEY | The publishable key |
DATABASE_URL | The Postgres connection string. The admin uses it to apply the migrations. Without it, the setup page asks for it. |
The first visit to /admin opens /admin/setup. See Supabase. Optional variables, such as the mail key, go in the environment of the running server, not the build. See Email.